We may earn a commission when you purchase through links on our site, at no extra cost to you.
⭐ Our Top Pick
🏆 Best Overall: Petmate Two Door Top Load Kennel — The dual-door design with top-loading access makes gradual desensitization training significantly easier than traditional front-only carriers.
💰 Best Value: SportPet Designs Foldable Carrier — A budget-friendly option that collapses flat for storage while offering a large door opening ideal for training sessions.
Introduction
If you've ever chased your cat under the bed for twenty minutes before a vet appointment, you're not alone. The carrier struggle is one of the most common behavioral challenges cat parents face, and it creates stress for both you and your cat. The scrambling, the scratching, the desperate attempts to become liquid and pour through your fingers—it's exhausting, and it conditions your cat to associate the carrier with negative experiences.
The solution isn't better catching techniques or more treats in the moment. It's a systematic desensitization process that transforms the carrier from a threat into a familiar, even comfortable space. Based on verified behavioral research and veterinarian recommendations, the method we outline below has helped thousands of cat owners eliminate carrier battles entirely. The key is starting weeks before you actually need the carrier, not the morning of the appointment.
In this guide, we'll walk you through the exact five-step desensitization protocol that works, recommend carriers that make training easier, and address the most common obstacles people encounter. Whether you're preparing for routine vet visits or longer travel, these techniques will save you time, stress, and potential injury.
What to Look For in a Training-Friendly Carrier
Top-loading or dual-door access — Carriers with top openings allow you to lower your cat in gently during early training stages, rather than forcing them through a narrow front door. This reduces initial resistance and makes the first several exposures less intimidating.
Adequate size for comfort — Your cat should be able to stand, turn around, and lie down comfortably. Cramped carriers create claustrophobic associations that undermine desensitization efforts. For most adult cats, aim for a carrier at least 24 inches long.
Removable top or easy disassembly — During desensitization, you'll want to remove the top half or door to create an open "cave" your cat can explore freely. Carriers that snap apart cleanly make this step effortless and speed up the training process.
Sturdy construction with secure latches — Flimsy carriers that flex or have weak door closures teach your cat they can escape with enough effort. This creates panic and undermines the sense of security you're trying to build. Look for reinforced corners and latch systems that lock reliably.
Neutral or calming design — Avoid carriers with excessive ventilation holes or mesh that create visual chaos. Solid sides with strategic airflow openings help your cat feel enclosed and safe, which is especially important for anxious cats during the desensitization process.
Easy to clean — Accidents happen during training, especially if your cat has pre-existing carrier anxiety. Carriers with removable plastic bottoms or machine-washable fabric components prevent lingering odors that could sabotage your progress.
💡 Pro Tip: If you're also upgrading other aspects of your cat's care routine, see our Cat Water Fountain vs Regular Bowl: Is It Worth the Money in 2026? guide for evidence-based hydration recommendations.
Step 1: Make the Carrier a Permanent Fixture (Week 1)
The single biggest mistake cat owners make is storing the carrier in a closet and only retrieving it for vet visits. This teaches your cat that carrier appearance = immediate stressful event. Instead, leave the carrier out in a high-traffic area of your home where your cat already feels comfortable.
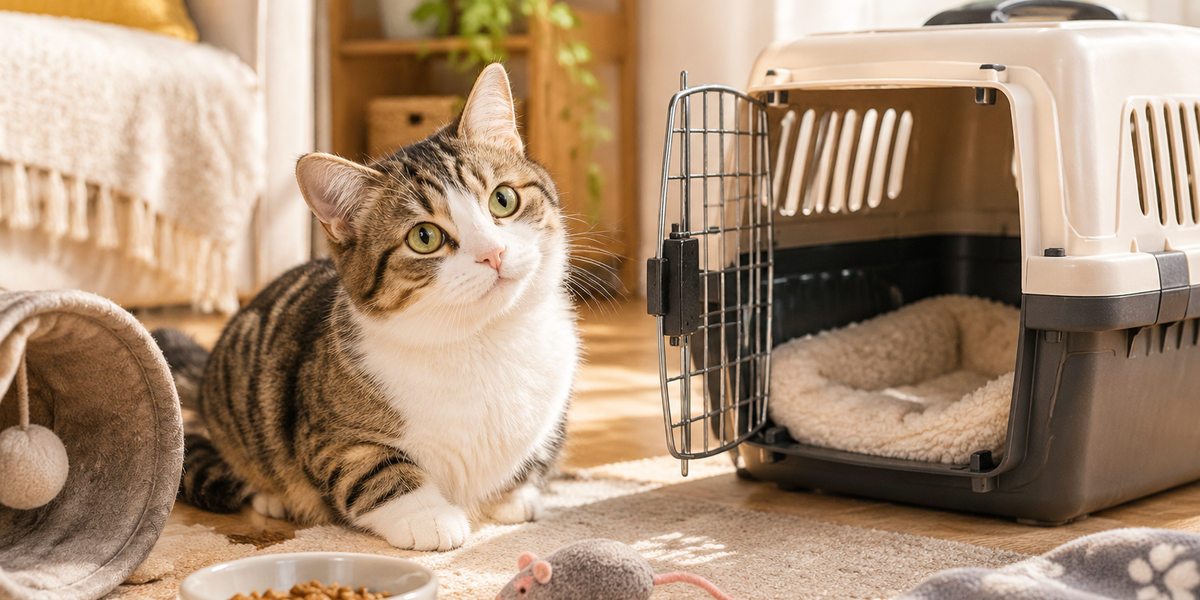
Remove the door or top half of the carrier completely during this phase. You want to eliminate any visual cues that suggest confinement. Place a soft blanket or towel inside—preferably one that already smells like your cat or your home. Position the carrier near a favorite sleeping spot, feeding station, or window perch.
Do nothing else. Don't coax your cat toward it, don't place treats inside yet, and don't try to encourage interaction. The goal this week is pure familiarization. Your cat needs to learn that the carrier is just another piece of furniture, not a trap. Most cats will investigate on their own within 3-5 days out of sheer curiosity.
If your cat actively avoids the carrier or shows signs of stress (flattened ears, wide eyes, hiding), you may need to start with the carrier in a less-trafficked area and gradually move it closer to their comfort zones over several days. Patience during this foundation stage prevents weeks of backtracking later.
Step 2: Create Positive Associations with Food (Week 2)
Once your cat has visually acclimated to the carrier's presence—meaning they walk past it without reaction—begin placing high-value treats near the carrier opening. Not inside yet, just within a foot of the entrance. Use treats your cat genuinely loves: freeze-dried chicken, tuna flakes, or their favorite commercial treats.
Feed these treats 2-3 times per day at the carrier location. Your cat will begin to associate the carrier's presence with positive outcomes. After 3-4 days of this, start placing treats just inside the carrier opening—but still where your cat can grab them without entering fully.
By the end of week two, most cats will place their front paws inside the carrier to reach treats. Some bold cats will walk fully inside. Don't rush cats who hesitate. Continue placing treats at whatever depth they're comfortable reaching for another few days if needed.
💡 Pro Tip: Spray Feliway Classic Calming Spray inside the carrier 15 minutes before treat sessions. The synthetic pheromones enhance positive associations and reduce baseline anxiety, especially for cats with prior trauma.
Step 3: Encourage Full Entry Without Closing (Week 3)
Now place treats or a portion of your cat's regular meal at the back of the carrier. The goal is to entice your cat to walk completely inside to eat. Continue leaving the door or top removed so there's zero sense of confinement.
If your cat enters, eats, and exits immediately, that's perfect. Repeat this 2-3 times daily. You're building a reliable behavior pattern: enter carrier, receive reward, exit freely. Some cats will begin napping inside the carrier during this week—a strong sign you're on track.
For hesitant cats, try feeding all meals inside the carrier for 3-5 days. Place the food bowl at whatever depth your cat is comfortable with, gradually moving it deeper over successive meals. Never force or physically place your cat inside; this single action can undo weeks of progress.
If your cat regresses during this stage—refusing to enter after previously doing so—you've likely moved too fast. Return to Step 2 protocols for another 3-4 days before trying again. Behavioral conditioning requires consistency and patience; rushing creates the exact anxiety you're trying to eliminate.
Step 4: Introduce Door Closure Gradually (Week 4)
Reattach the carrier door or top, but prop it fully open with a towel or book so it can't swing shut accidentally. Continue the feeding routine from Step 3. After 2-3 days, let the door rest naturally open (without propping) while your cat eats inside.
Once your cat enters comfortably with the door in place, begin closing it for 2-3 seconds immediately after they start eating, then open it again before they finish. Repeat this daily, gradually extending the closed duration: 5 seconds, then 10, then 30, then one minute.
Watch for stress signals: if your cat stops eating, vocalizes, or tries to push the door open, you've progressed too quickly. Open the door immediately and return to a shorter duration the next session. The goal is to reach a point where your cat continues eating calmly with the door closed for 3-5 minutes.
Some cats vocalize briefly when the door first closes but settle within seconds—this is normal. But sustained crying, scratching at the door, or refusing food means you need to slow down. Every cat has a different tolerance threshold, and respecting it is crucial for long-term success.
Step 5: Add Movement and Transport (Week 5)
With your cat comfortable inside the closed carrier, gently lift it a few inches off the ground while your cat is eating inside. Set it back down after 3-5 seconds. Repeat this daily, gradually increasing height and duration until you can lift and hold the carrier for 30 seconds without your cat reacting.
Next, walk a few steps while carrying the closed carrier. Start with just 3-5 steps across the room, reward your cat with treats or praise, then set the carrier down and open it. Over the next several days, gradually increase distance: across the room, down the hallway, to another room.
Once your cat tolerates indoor movement, take the carrier to your car. Place it in the backseat or cargo area (secured with a seatbelt), sit in the car for 2-3 minutes without starting the engine, then return inside and release your cat. Repeat this for 2-3 days.
Finally, start the engine and let it idle for one minute with the carrier in place. Turn the engine off, return inside, release your cat. After 2-3 sessions, take a very short drive—just around the block. Gradually extend drive duration over a week until you can complete a full 10-15 minute trip without your cat showing distress.
💡 Pro Tip: Place a towel over the carrier during car rides to reduce visual stimulation. Cats feel more secure when they can't see the rapidly changing environment outside, which minimizes motion-related anxiety.
Choosing the Right Carrier for Desensitization Training
Petmate Two Door Top Load Kennel
| Criteria | Score |
|----------|-------|
| Training Accessibility | 9/10 |
| Durability | 8/10 |
| Ventilation | 8/10 |
| Value | 9/10 |
The Petmate Two Door Top Load Kennel is our top recommendation for desensitization training because of its dual-access design. The top-loading door allows you to lower your cat in gently during early stages, while the front door becomes useful once your cat enters voluntarily. The carrier snaps apart cleanly at the midpoint, making it simple to remove the top half and create an open cave configuration during week one.
Based on verified buyer reviews, the carrier holds up well to repeated use and cleaning, with secure latches that prevent escapes even from determined cats. The ventilation slots are adequate without creating visual chaos, and the neutral gray color blends into most home environments. At $34.99, it's priced competitively with single-door alternatives while offering significantly more training flexibility.
✅ Pros:
- Top-loading door makes initial placement stress-free
- Disassembles easily for open-carrier training phases
- Durable plastic construction withstands years of use
❌ Cons:
- Heavier than soft-sided carriers (less ideal for long carries)
- Plastic can become brittle in extreme cold storage
Sherpa Original Deluxe Pet Carrier
| Criteria | Score |
|----------|-------|
| Comfort | 9/10 |
| Portability | 8/10 |
| Training Accessibility | 7/10 |
| Value | 7/10 |
For cats who respond better to den-like enclosures, the Sherpa Original Deluxe offers soft-sided comfort in an airline-approved design. The spring-wire frame pops open for training, and the plush sherpa lining creates an immediately cozy environment. Buyer reviews consistently note that anxious cats settle faster in this carrier compared to hard-sided alternatives, likely due to the enclosed feeling and soft texture.
The side entry requires more coaxing during initial training compared to top-loading designs, which drops its training accessibility score. However, once desensitization is complete, the carrier excels for actual transport—it's comfortable to carry, fits under most airline seats, and the mesh panels provide excellent ventilation without making cats feel exposed.
✅ Pros:
- Soft construction feels less threatening to anxious cats
- Airline-approved for cabin travel
- Padded shoulder strap for comfortable carrying
❌ Cons:
- Side-only entry makes early training stages harder
- Higher price point than hard-sided alternatives
SportPet Designs Foldable Carrier
| Criteria | Score |
|----------|-------|
| Value | 9/10 |
| Storage Convenience | 10/10 |
| Durability | 6/10 |
| Training Accessibility | 8/10 |
The SportPet Foldable Carrier is the budget champion in this category, offering a large side door opening and collapsible design at under $30. For cat owners just beginning desensitization training, this carrier provides a low-risk entry point. The fabric construction feels less intimidating than hard plastic to some cats, and the carrier pops open or folds flat in seconds.
Buyer reviews note that the fabric can develop wear after a year of frequent use, and the zipper occasionally snags on the mesh lining. However, for the price, it's an excellent starter carrier that handles the desensitization process well. If your cat damages it during training or you decide to upgrade later, the financial commitment is minimal.
✅ Pros:
- Collapses completely flat for closet storage
- Large door opening reduces claustrophobia
- Budget-friendly for first-time training
❌ Cons:
- Fabric less durable than hard-sided options
- Not suitable for aggressive scratchers or chewers
Feliway Classic Calming Spray
| Criteria | Score |
|----------|-------|
| Effectiveness | 8/10 |
| Ease of Use | 10/10 |
| Safety | 10/10 |
| Value | 7/10 |
While not a carrier itself, Feliway Classic Calming Spray is a valuable supplement to desensitization training. The spray contains synthetic analogs of feline facial pheromones, which cats naturally produce when they rub their face on objects they consider safe. Spraying the inside of the carrier 15 minutes before training sessions creates an immediate olfactory cue that signals "this space is safe."
Peer-reviewed studies published in the Journal of Feline Medicine and Surgery confirm that synthetic pheromones reduce stress behaviors in 70-80% of cats. Buyer reviews align with this data—most owners report noticeable calming effects, though a minority of cats show minimal response. The spray is odorless to humans and non-toxic to cats, making it safe for daily use throughout the desensitization process.
✅ Pros:
- Clinically proven to reduce feline stress responses
- Works within 15 minutes of application
- Safe for kittens, seniors, and multi-cat households
❌ Cons:
- Requires reapplication before each training session
- More expensive than training through food rewards alone
Troubleshooting Common Desensitization Obstacles
My cat still runs when I bring out the carrier, even after weeks of training. You may have skipped the crucial step of leaving the carrier out permanently. Cats have excellent pattern recognition—if the carrier only appears before stressful events, no amount of treat-based training will override that association. Return to Step 1 and leave the carrier in plain sight for at least two weeks before attempting further training.
My cat enters the carrier for treats but panics when the door closes. This indicates you progressed to door closure too quickly. Return to Step 3 and spend another week feeding meals inside the open carrier. Then reintroduce door closure at 1-2 second intervals, increasing duration by only 2-3 seconds per session. Some cats need three weeks at this stage instead of one.
My cat vocalizes during car rides despite calm carrier behavior at home. Motion sensitivity is distinct from carrier anxiety. Try shorter drives initially—just to the end of your driveway and back. Cover the carrier completely with a towel to reduce visual stimulation. Consider playing calming music or white noise in the car. For severe cases, consult your veterinarian about short-term anti-nausea medication for training trips.
My cat tolerates the carrier but urinates inside during transport. This can indicate residual stress or a medical issue. Ensure you're not feeding large meals within 2-3 hours of planned car trips. Line the carrier with absorbent pads during the training phase. If urination persists after following the full desensitization protocol, consult your veterinarian to rule out underlying urinary anxiety or medical conditions.
Frequently Asked Questions
How long does carrier desensitization actually take?
For most cats starting with moderate anxiety, expect 4-6 weeks of consistent daily training to reach comfortable car transport. Cats with severe carrier trauma may need 8-12 weeks. Kittens or cats with no prior negative experiences can often complete the process in 2-3 weeks. The key variable is your consistency—missing several days of training resets progress significantly.
Can I speed up the process if I have a vet appointment next week?
No. Rushing desensitization creates the exact problem you're trying to solve—reinforcing the carrier-stress association. If you have an imminent appointment, focus on making that single trip as low-stress as possible (use calming spray, cover the carrier, minimize handling), then begin proper desensitization training afterward for future visits. Behavioral conditioning cannot be compressed without undermining results.
Will my cat forget the training if I don't use the carrier regularly?
Once fully desensitized, cats retain carrier comfort for months between uses, though you may see slight regression after 6+ months of no exposure. Maintain the association by feeding occasional treats inside the carrier even when you don't have upcoming trips—once every 2-3 weeks is sufficient. If you know a vet visit is coming, do 2-3 refresher sessions in the week prior.
My cat is fine with the carrier at home but panics at the vet clinic. What's wrong?
This is normal—you've successfully desensitized carrier acceptance but not the clinic environment itself. The sounds, smells, and presence of other animals at vet clinics are separate stressors. Consider "happy visits" where you take your cat to the clinic just to sit in the waiting room for 5 minutes, receive treats, and leave. Many veterinarians support this practice for anxious patients.
Do I need a different carrier for air travel versus car trips?
Not necessarily, but airline-approved carriers must fit under the seat (typically 18" x 11" x 11" max). If you've trained with a larger carrier, you'll need to repeat the desensitization process with an airline-compliant carrier at least 4-6 weeks before your flight. The training protocol remains identical—just applied to the new carrier. Don't assume the training will automatically transfer.
Final Thoughts
Carrier desensitization isn't a quick fix, but it's a permanent solution that improves your cat's quality of life and your own stress levels for years to come. The investment of 5-10 minutes daily over 4-6 weeks eliminates the need for wrestling matches, scratched arms, and the guilt of knowing you're terrifying your cat before every vet visit.
The most common mistake we see is starting this training the week before an appointment—desensitization is a long game. Begin now, even if you don't have an upcoming need for the carrier. By the time your cat's next annual exam arrives, carrier time will be a non-event instead of a household disaster.
If you're looking for other ways to reduce your cat's stress during grooming and care routines, check out our Cat Nail Clippers vs Grinder: Which Should You Choose in 2026? guide for behavioral conditioning approaches to nail care.
Editor's Choice
After comparing dozens of carriers and training protocols, these are our top recommendations:
🥇 Best Overall: Petmate Two Door Top Load Kennel — The dual-door design and removable top make every stage of desensitization training significantly easier than single-access carriers.
💰 Best Value: SportPet Designs Foldable Carrier — An affordable option that handles the training process well and stores conveniently between uses.
🧪 Training Booster: Feliway Classic Calming Spray — Clinically proven synthetic pheromones that reduce stress and accelerate positive associations during desensitization sessions.